
Chronicle #11 - Make your own CD-i Port Splitter for 2 players games!
Quote from omegalfa on 17/04/2020, 22:59
The World of CD-i Chronicle #11You have some 2 players games but never experienced them by playing in 2 players mode?
Don't worry, you have not the only one, this is actually a very common situation, and for many reasons... but believe me, you don't know what you are missing!
The first one is because a CD-i gamepad is expensive, so imagine having 2 gamepads...
The 2nd one is because not all CD-i players allow you to connect 2 controllers without the need of a special accessory.Let's start from the beginning, the early CD-i players let you connect 2 controllers for player 1 and player 2 by using Input 1 (front side) and Input 2 (rear side).
The players that allows you to connect 2 controllers without the the need of a Port Splitter are:
910/00, 205/00, 205/05, 210/00, 210/20, 220/00, 220/20, 220/40, 21TCDi30 (Combined CD-i + TV).If you own one of those players, then, you can stop reading this article and start playing with your friend right now (well, not now because at the time I am writting this article, we are still under the threat of coronavirus)!
If you don't have any of them or you also have others players and want to use them for 2 players games, then follow me into this adventure! We will create our own Port Splitter!
Wait wait… What is a Port Splitter?
That is a very good question! Thank you in advance for asking! 😉
A Splitter is an accessory that will connect into Input 1 from one extremity, and in the other side, will let you connect 2 controllers using 2 ports.
1st of all, before you start searching for new gamepads over the internet, remember an important thing...
ANY WIRES CONTROLLER CAN BE USE AS A CONTROLLER!
What does it means? Simple, if you want to try a Port Splitter you may already own, or test the one you are about to create, you just need to use 2 wired controllers. Thy can be the Peacekeeper gun as player 1 and the Trackerball for player 2 for example, or a CD-i mouse and the Roller Controller. They all will work and let you play any games.What will you need?
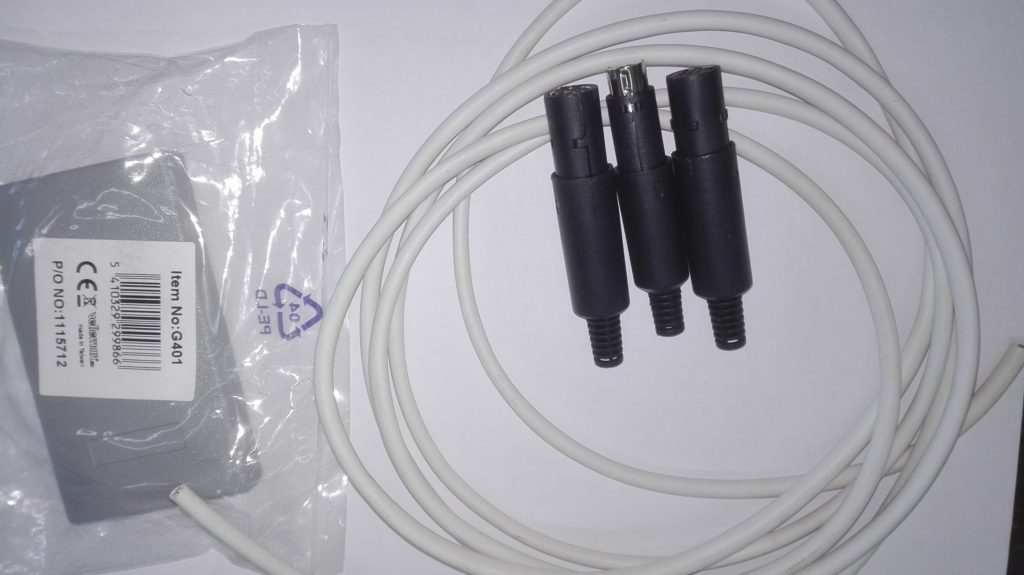
– 1 male Mini-DIN 8 pins.
– 2 female Mini-DIN 8 Pins.
– A soldering iron (30W if possible).
– Solder.
– 1 light little box.
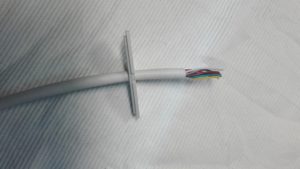
– 1 meter length of cable with 8 wires.
– Retractable sleeve.
– Double-sided adhesive tape.[gallery columns="1" size="large" ids="13558"]
Basic soldering skills are needed! If you think you are not able to do this, please contact an electronic repair store, a friend, or if you prefer, I am selling them at the price of ---€ mail ports included (contact me here).
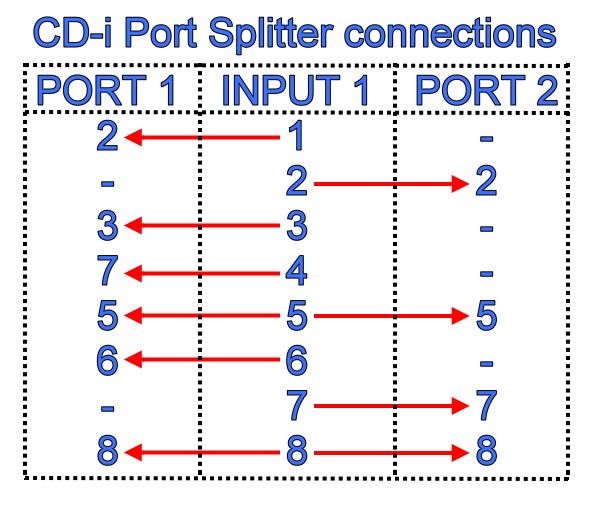
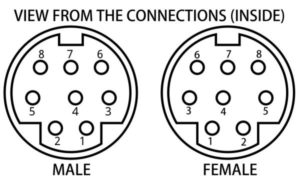
For the following work, you will need this table information to know which wires connect to which pins.
[gallery columns="1" size="full" ids="13557"]
[gallery columns="1" size="medium" ids="13567"]
IMPORTANT NOTES:
- Remember to take a note about the wires colors and pins numbers, it will save you time in the upcoming steps.- It is important to use a 30 Watts solder, a higher power may damage the very fin pins connectors. Bad connection to the player or to the controllers can result.
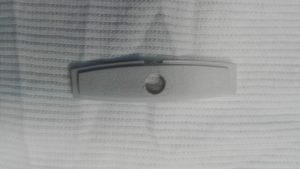
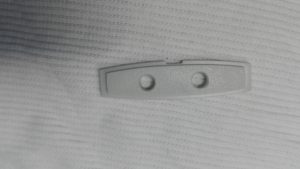
1. Prepare the little box:
I am using the one you see on the pictures, you are free to choose the box you want to use. Just remember to use a light and small one.
Open it.
In one side, open 1 hole using a drill for the cable that goes to the CD-i Player.
In the opposite side, open 2 holes using the same drill for the 2 cable that will connect to the controllers.
Remember to use a drill that will feet exactly with the cable, to avoid loose.
[gallery columns="2" size="medium" ids="13530,13561"]
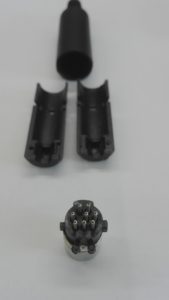
2. Soldering INPUT 1:
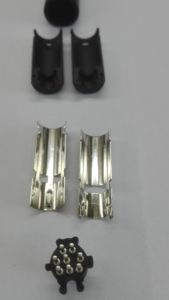
- Dismantle the male Mini-DIN 8 pins, and solder the pins following INPUT 1 information from the table.
That means you will have to connect all the pins.
- Cut the cable coming from Input 1 about 50 centimeters long.[gallery size="medium" ids="13559,13540,13537"]
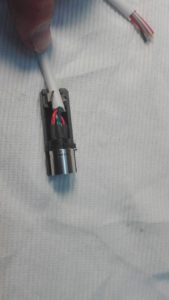
3. Soldering PORT 1:
- Dismantle the female Mini-DIN 8 pins, and solder the pins following the PORT 1 information from the table.
That means you will have to connect 6 wires in total.
- Cut the cable coming from PORT 1 about 20 centimeters long.[gallery size="medium" ids="13560,13535,13536"]
4. Soldering PORT 2:
- Dismantle the female Mini-DIN 8 pins, and solder the pins following the PORT 2 information from the table.
That means you will have to connect 4 wires in total.
- Cut the cable coming from PORT 2 about 20 centimeters long.5. Insert the cable into the box:
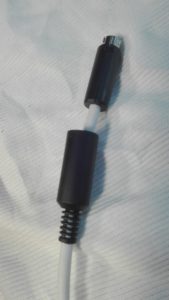
- Insert INPUT 1 into the one hole side.
- Insert PORT 1 and PORT 2 into the two holes side.
- Prepare the wires to be soldered.
- Use the retractable sleeve to isolate the soldering points.[gallery columns="2" size="medium" ids="13562,13563"]
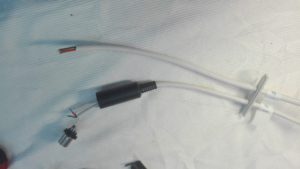
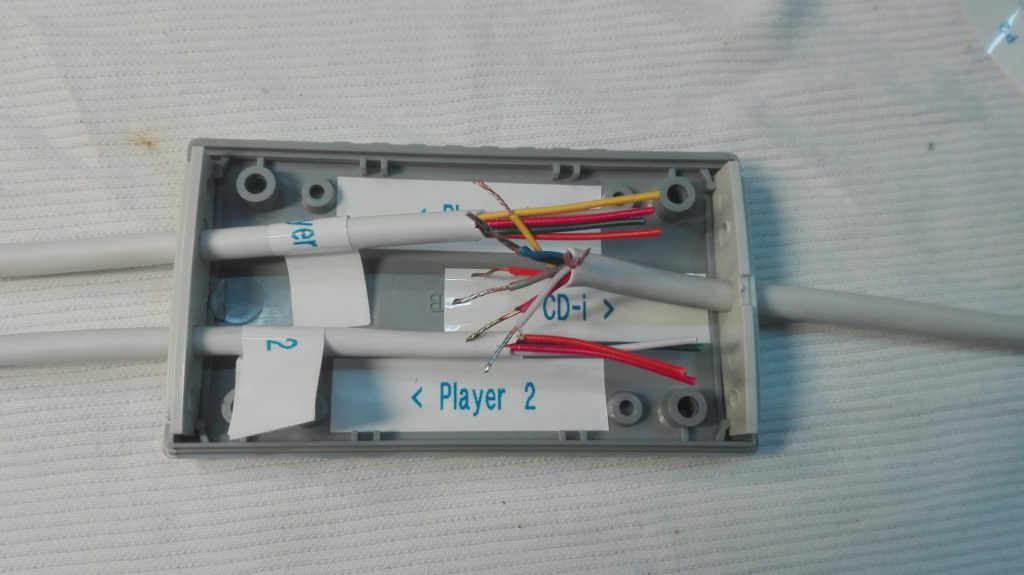
6. Connect the 3 cables:
- Use the table on the top of the article to know to soldering configuration.[gallery columns="1" size="large" ids="13564"]
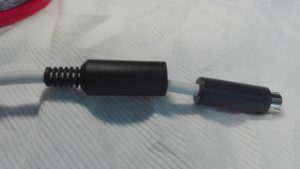
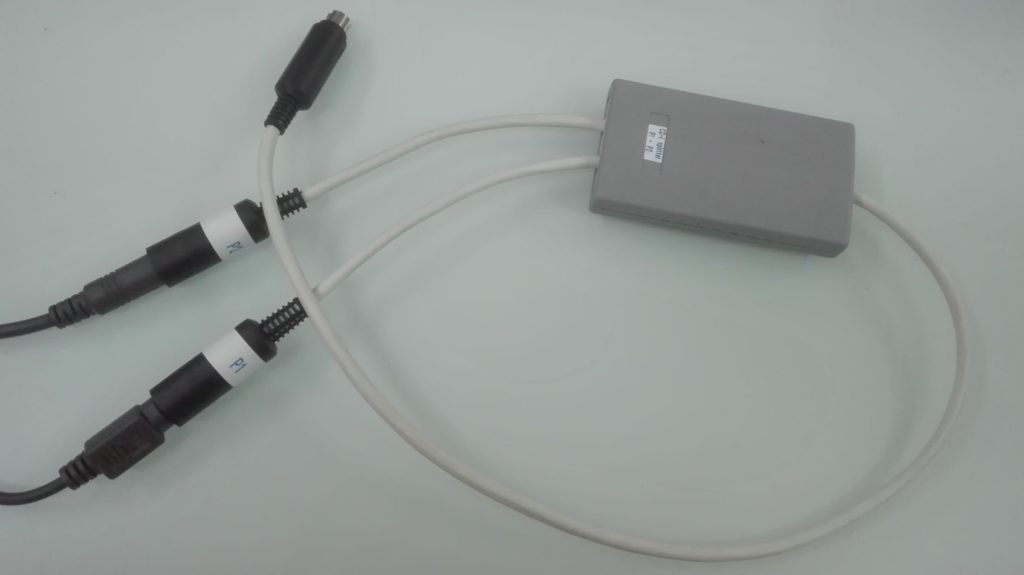
7. Close the box:
- Close the box.
- Place the double-sided adhesive tape at the bottom side of the box, and fix the box on your CD-i player. This way the box will not fall (Only optional).
- Test your new Port Splitter using 2 wires controllers.[gallery columns="1" size="large" ids="13566"]
PORT 1 or PORT 2 to play as Player 1?
Officially Philips explain this way:For CD-i 450 or 550 Models produced before August 1994:
- If you own one of those models, and you are using the Port Splitter but only using 1 controller only, then you will need to connect the controller under INPUT 1.
- If you own one of those models, and you are using the Port Splitter using 2 controllers, then Player 1 will work under INPUT 2, and Player 2 will work under INPUT 1. But Player 2 controller will only work after Player 1 choose all the options and the game are ready to be played as 2 players.For CD-i players produced from August 1994 and onward:
- If you own one of those models, and you are using the Port Splitter but only using 1 controller only, then you will need to connect the controller under INPUT 2.
- If you own one of those models, and you are using the Port Splitter using 2 controllers, then Player 1 will work under INPUT 2, and Player 2 will work under INPUT 1. But Player 2 controller will only work after Player 1 choose all the options and the game are ready to be played as 2 players.This is due to the internet kit and Télé CD-i for the use of the modem connection.
In fact, if you turn on your CD-i player (before or after August 1994), the player will recognize the controller, wherever it is connected on INPUT 1 or INPUT 2.Enjoy your brand new Port Splitter and call your friends and neighbors to finally play 2 players CD-i games!
Special thank to Rosewood from Retrostuff.org who kindly share with me some technical information and brochures.
And this time in French, une spéciale dédicasse à MomoRetro qui va enfin pouvoir tester ses jeux! 😉Find all the Chronicles at www.theworldofcdi.com
Contact: omegalfa@theworldofcdi.com
Twitter: @omegalfaptWritten by omegalfa, © 17/04/2020

The World of CD-i Chronicle #11
You have some 2 players games but never experienced them by playing in 2 players mode?
Don't worry, you have not the only one, this is actually a very common situation, and for many reasons... but believe me, you don't know what you are missing!
The first one is because a CD-i gamepad is expensive, so imagine having 2 gamepads...
The 2nd one is because not all CD-i players allow you to connect 2 controllers without the need of a special accessory.
Let's start from the beginning, the early CD-i players let you connect 2 controllers for player 1 and player 2 by using Input 1 (front side) and Input 2 (rear side).
The players that allows you to connect 2 controllers without the the need of a Port Splitter are:
910/00, 205/00, 205/05, 210/00, 210/20, 220/00, 220/20, 220/40, 21TCDi30 (Combined CD-i + TV).
If you own one of those players, then, you can stop reading this article and start playing with your friend right now (well, not now because at the time I am writting this article, we are still under the threat of coronavirus)!
If you don't have any of them or you also have others players and want to use them for 2 players games, then follow me into this adventure! We will create our own Port Splitter!
Wait wait… What is a Port Splitter?
That is a very good question! Thank you in advance for asking! 😉
A Splitter is an accessory that will connect into Input 1 from one extremity, and in the other side, will let you connect 2 controllers using 2 ports.
1st of all, before you start searching for new gamepads over the internet, remember an important thing...
ANY WIRES CONTROLLER CAN BE USE AS A CONTROLLER!
What does it means? Simple, if you want to try a Port Splitter you may already own, or test the one you are about to create, you just need to use 2 wired controllers. Thy can be the Peacekeeper gun as player 1 and the Trackerball for player 2 for example, or a CD-i mouse and the Roller Controller. They all will work and let you play any games.
What will you need?
– 1 male Mini-DIN 8 pins.
– 2 female Mini-DIN 8 Pins.
– A soldering iron (30W if possible).
– Solder.
– 1 light little box.
– 1 meter length of cable with 8 wires.
– Retractable sleeve.
– Double-sided adhesive tape.
Basic soldering skills are needed! If you think you are not able to do this, please contact an electronic repair store, a friend, or if you prefer, I am selling them at the price of ---€ mail ports included (contact me here).
For the following work, you will need this table information to know which wires connect to which pins.
-

- Connections diagram
IMPORTANT NOTES:
- Remember to take a note about the wires colors and pins numbers, it will save you time in the upcoming steps.- It is important to use a 30 Watts solder, a higher power may damage the very fin pins connectors. Bad connection to the player or to the controllers can result.
1. Prepare the little box:
I am using the one you see on the pictures, you are free to choose the box you want to use. Just remember to use a light and small one.
Open it.
In one side, open 1 hole using a drill for the cable that goes to the CD-i Player.
In the opposite side, open 2 holes using the same drill for the 2 cable that will connect to the controllers.
Remember to use a drill that will feet exactly with the cable, to avoid loose.
2. Soldering INPUT 1:
- Dismantle the male Mini-DIN 8 pins, and solder the pins following INPUT 1 information from the table.
That means you will have to connect all the pins.
- Cut the cable coming from Input 1 about 50 centimeters long.
3. Soldering PORT 1:
- Dismantle the female Mini-DIN 8 pins, and solder the pins following the PORT 1 information from the table.
That means you will have to connect 6 wires in total.
- Cut the cable coming from PORT 1 about 20 centimeters long.

4. Soldering PORT 2:
- Dismantle the female Mini-DIN 8 pins, and solder the pins following the PORT 2 information from the table.
That means you will have to connect 4 wires in total.
- Cut the cable coming from PORT 2 about 20 centimeters long.
5. Insert the cable into the box:
- Insert INPUT 1 into the one hole side.
- Insert PORT 1 and PORT 2 into the two holes side.
- Prepare the wires to be soldered.
- Use the retractable sleeve to isolate the soldering points.
6. Connect the 3 cables:
- Use the table on the top of the article to know to soldering configuration.
7. Close the box:
- Close the box.
- Place the double-sided adhesive tape at the bottom side of the box, and fix the box on your CD-i player. This way the box will not fall (Only optional).
- Test your new Port Splitter using 2 wires controllers.
PORT 1 or PORT 2 to play as Player 1?
Officially Philips explain this way:For CD-i 450 or 550 Models produced before August 1994:
- If you own one of those models, and you are using the Port Splitter but only using 1 controller only, then you will need to connect the controller under INPUT 1.
- If you own one of those models, and you are using the Port Splitter using 2 controllers, then Player 1 will work under INPUT 2, and Player 2 will work under INPUT 1. But Player 2 controller will only work after Player 1 choose all the options and the game are ready to be played as 2 players.For CD-i players produced from August 1994 and onward:
- If you own one of those models, and you are using the Port Splitter but only using 1 controller only, then you will need to connect the controller under INPUT 2.
- If you own one of those models, and you are using the Port Splitter using 2 controllers, then Player 1 will work under INPUT 2, and Player 2 will work under INPUT 1. But Player 2 controller will only work after Player 1 choose all the options and the game are ready to be played as 2 players.This is due to the internet kit and Télé CD-i for the use of the modem connection.
In fact, if you turn on your CD-i player (before or after August 1994), the player will recognize the controller, wherever it is connected on INPUT 1 or INPUT 2.
Enjoy your brand new Port Splitter and call your friends and neighbors to finally play 2 players CD-i games!
Special thank to Rosewood from Retrostuff.org who kindly share with me some technical information and brochures.
And this time in French, une spéciale dédicasse à MomoRetro qui va enfin pouvoir tester ses jeux! 😉
Find all the Chronicles at http://www.theworldofcdi.com
Contact: omegalfa@theworldofcdi.com
Twitter: @omegalfapt
Written by omegalfa, © 17/04/2020